


-
1
-
2
-
3
-
4
-
5
-
6
-
7
-
8
-
9
해당 자료는 3페이지 까지만 미리보기를 제공합니다.
3페이지 이후부터 다운로드 후 확인할 수 있습니다.
3페이지 이후부터 다운로드 후 확인할 수 있습니다.


본문내용
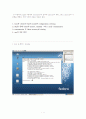
첫 수업에서 jtag을 사용하여 bootloader의 설치와 minicom의 세팅 그리고 minicom의 사용법을 배웠다. 이번 시간의 목표는 다음과 같다.
1. host와 client의 tftp의 install과 configuration settiong
2. tftp를 통해 client에 kernel, ramdisk 그리고 usr을 transmission
3. transmission 후 flash memory에 wirting
4. usr의 작동 확인
--------------------------------------------------------------------
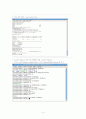
1. host ip 확인 / ifconfig
--------------------------------------------------------------------
2, minicom에서 kernel, ramdisk 그리고 usr을 erase and reset
--------------------------------------------------------------------
3. tftp가 host에 install되어있는지 확인 / rpm -qa | grep tftp
--------------------------------------------------------------------
4. tftp 설치 완료 / yum install tftp
--------------------------------------------------------------------
5. host에 tftpboot 라는 tftp 폴더를 생성 / mkdir tftpboot
그리고 cd의 zImage, ramdisk16.gz 그리고 qtopia.jffs를 /tftpboot로 복사
--------------------------------------------------------------------6. /etc/xinetd.d의 tftf의 configuration을 수정
--------------------------------------------------------------------
7. tftp setting restart / serivce xinetd restart
--------------------------------------------------------------------
8. minicom에 들어가서 status확인 / status (ip가 잡혀있지 않다)
--------------------------------------------------------------------
9. host와 client의 setip를 한다. / setip 203.232.133.150 203.232.133.151
--------------------------------------------------------------------
10. tftp 실행에 앞서 방화벽을 해지한다. / lokkit
--------------------------------------------------------------------
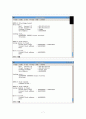
11. kernel, ramdisk 그리고 usr을 tftp를 이용하여 전송한다. 그리고 flash에 입힌다.
--------------------------------------------------------------------
--------------------------------------------------------------------
--------------------------------------------------------------------
--------------------------------------------------------------------
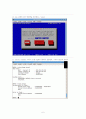
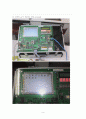
12. EMPOS2를 reset하여 bootloader를 지나 kernel, ramdisk 그리고 usr까지 잘 깔렸는지 확인한다.
<성공화면>
--------------------------------------------------------------------
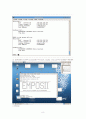
13. 본체에 usr이 작동되는 화면 (qtopia를
1. host와 client의 tftp의 install과 configuration settiong
2. tftp를 통해 client에 kernel, ramdisk 그리고 usr을 transmission
3. transmission 후 flash memory에 wirting
4. usr의 작동 확인
--------------------------------------------------------------------
1. host ip 확인 / ifconfig
--------------------------------------------------------------------
2, minicom에서 kernel, ramdisk 그리고 usr을 erase and reset
--------------------------------------------------------------------
3. tftp가 host에 install되어있는지 확인 / rpm -qa | grep tftp
--------------------------------------------------------------------
4. tftp 설치 완료 / yum install tftp
--------------------------------------------------------------------
5. host에 tftpboot 라는 tftp 폴더를 생성 / mkdir tftpboot
그리고 cd의 zImage, ramdisk16.gz 그리고 qtopia.jffs를 /tftpboot로 복사
--------------------------------------------------------------------6. /etc/xinetd.d의 tftf의 configuration을 수정
--------------------------------------------------------------------
7. tftp setting restart / serivce xinetd restart
--------------------------------------------------------------------
8. minicom에 들어가서 status확인 / status (ip가 잡혀있지 않다)
--------------------------------------------------------------------
9. host와 client의 setip를 한다. / setip 203.232.133.150 203.232.133.151
--------------------------------------------------------------------
10. tftp 실행에 앞서 방화벽을 해지한다. / lokkit
--------------------------------------------------------------------
11. kernel, ramdisk 그리고 usr을 tftp를 이용하여 전송한다. 그리고 flash에 입힌다.
--------------------------------------------------------------------
--------------------------------------------------------------------
--------------------------------------------------------------------
--------------------------------------------------------------------
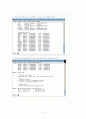
12. EMPOS2를 reset하여 bootloader를 지나 kernel, ramdisk 그리고 usr까지 잘 깔렸는지 확인한다.
<성공화면>
--------------------------------------------------------------------
13. 본체에 usr이 작동되는 화면 (qtopia를
추천자료
- 가격1,500원
- 페이지수9페이지
- 등록일2007.03.04
- 저작시기2006.9
- 파일형식한글(hwp)
- 자료번호#391277

본 자료는 최근 2주간 다운받은 회원이 없습니다.


소개글